I thought I would show a pen I have in progress at present, following up on the thread about taps and dies for kitless. Might help a penny or two to drop into place!
First, you should note that I use brass for my pen components (which I then 'skin' with timber much like a kit tube). I don't like plastic and don't work with it if I don't have to. However, the principle would be identical if you were tapping acrylic.
So, the components:
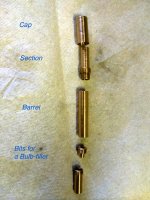
There are three key parts: Section, Cap, Barrel. Ignore the two down the bottom, they are for a bulb filler and are unnecessary for a normal cartridge/converter kitless.
The die is used to make 'outside' or 'male' threads. I highly recommend that you get hold of a tailstock die holder (about £30 from RDG tools or the like). This helps to ensure that you apply threads at right angles to the component centre line:
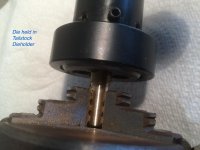
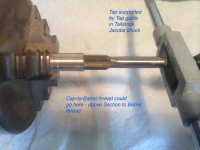
The tap is used to make 'inside' or 'female' threads. Again I highly recommend that you get hold of a tap guide that you can mount into a Jacobs chuck in the tailstock, to ensure that your threads are 'straight'. I use a second tap for pretty much everything - I'm sure Grump would disapprove but it's never been a problem. Brass and acrylic are waaaaay softer than steel or stainless!
One final point: There are two approaches to placement of the cap-to-barrel threads. I make the section about five mm longer and the barrel correspondingly shorter, and thread the cap threads onto the section immediately in front of the section-to-barrel threads, so strictly speaking the cap screws to the section rather than the barrel:
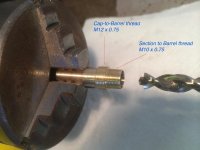
The advantage of this is that I don't have to worry about the remaining thickness of material on the front edge of my barrel (if you do the math, the remaining solid wall thickness between a M12 x 0.75 and an M10 by anything is about 0.6mm), while the disadvantage is that it is possible to unscrew the section from the barrel while trying to remove the cap.
If you refer to the photo showing the tap you will see that I have marked the alternative position for the Cap-to-Barrel threads. If you go down this route remember to shorten the section and lengthen the barrel by corresponding amounts to allow for the change of position of the cap-to-barrel threads.
I hope this helps.
First, you should note that I use brass for my pen components (which I then 'skin' with timber much like a kit tube). I don't like plastic and don't work with it if I don't have to. However, the principle would be identical if you were tapping acrylic.
So, the components:

There are three key parts: Section, Cap, Barrel. Ignore the two down the bottom, they are for a bulb filler and are unnecessary for a normal cartridge/converter kitless.
The die is used to make 'outside' or 'male' threads. I highly recommend that you get hold of a tailstock die holder (about £30 from RDG tools or the like). This helps to ensure that you apply threads at right angles to the component centre line:

The tap is used to make 'inside' or 'female' threads. Again I highly recommend that you get hold of a tap guide that you can mount into a Jacobs chuck in the tailstock, to ensure that your threads are 'straight'. I use a second tap for pretty much everything - I'm sure Grump would disapprove but it's never been a problem. Brass and acrylic are waaaaay softer than steel or stainless!

One final point: There are two approaches to placement of the cap-to-barrel threads. I make the section about five mm longer and the barrel correspondingly shorter, and thread the cap threads onto the section immediately in front of the section-to-barrel threads, so strictly speaking the cap screws to the section rather than the barrel:

The advantage of this is that I don't have to worry about the remaining thickness of material on the front edge of my barrel (if you do the math, the remaining solid wall thickness between a M12 x 0.75 and an M10 by anything is about 0.6mm), while the disadvantage is that it is possible to unscrew the section from the barrel while trying to remove the cap.
If you refer to the photo showing the tap you will see that I have marked the alternative position for the Cap-to-Barrel threads. If you go down this route remember to shorten the section and lengthen the barrel by corresponding amounts to allow for the change of position of the cap-to-barrel threads.
I hope this helps.


