• Thanks for visiting The Penturners Forum today.

    There are many features and resources that currently you are unable to see or access, either because you're not yet registered, or if you're already registered, because you're not logged in.

    To gain full access to the forum, please log in or register now. Registration is completely free, it only takes a few seconds, and you can join our well established community of like-minded pen makers.

A long way to go

Garno

Fellow
Joined
May 12, 2021
Posts
1,372
Location
Dronfield
First Name
Gary
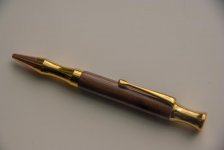
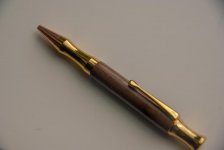
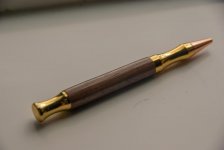
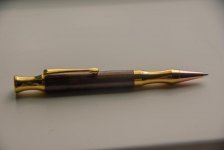
I have finally made a pen that I sort of like.
I say sort of because it has lines showing. I seem to be going great guns then I go onto the 320 grit sanding and lines just appear out of the blue, Do I go back to the 220 grit to try and get rid of them or start again from the 120 grit? regardless of the answer I chose the wrong option :sob:

This is a Rocket Bullet Pen made from Walnut, I followed the guide written by [MENTION=735]Phil Dart[/MENTION] for the melamine and I am glad I did, I am actually pleased with the effect it had on the walnut, I am not sure if the gloss is "deep" enough and if it would work as well on a lighter coloured wood, I shall find out tomorrow.

Rocket Bullet Pen.
Walnut
Finish:- Sanding sealer, Melamine, Carnauba Stick.
Total time 4hrs 30 mins
 

Attachments

  • IMGP0703_edited 1.jpg
    IMGP0703_edited 1.jpg
    18.5 KB · Views: 39
  • IMGP0704_edited 2.jpg
    IMGP0704_edited 2.jpg
    18.4 KB · Views: 39
  • IMGP0705_edited 3.jpg
    IMGP0705_edited 3.jpg
    18.7 KB · Views: 39
  • IMGP0706_edited 4.jpg
    IMGP0706_edited 4.jpg
    17.7 KB · Views: 39

flexi

Executive Member
Joined
Sep 12, 2014
Posts
6,457
Location
Maidstone
First Name
mark
Questions,...... Are you wiping the blank after each different grit? sometimes grit remains and can cause this.
Are you sanding along the blank also this also removes radial rings.
Are you using clean sand paper/ mesh/ pads? Again contamination is not helpful
Unfortunately always treat sand paper as if someone else bought it... And 'CLEARLY' Mark the grit grade on it, it doesn't help if your going backwards through them...
 

Phil Dart

Moderator
Executive Member
Joined
Nov 28, 2014
Posts
5,491
Location
Colebrooke, Devon
First Name
Phil
Sometimes radial marks are an illusion left behind by the sanding dust, and sometimes they really are radial marks. In either case, you can overcome them by, as Mark has said, stopping the lathe and sanding parallel to the lathe bed, and removing the dust from the grit you've just used before moving on. I keep a soft paint brush handy by my lathe specially for the purpose
 

Bill Mooney

Blind old git
Grand Master
Joined
Aug 16, 2014
Posts
11,096
Location
County Durham
First Name
Bill
Check for sanding rings between each grit & if you find any go back 1 grit & sand again, check then move on if ok.
 

21William

Fellow
Joined
Jan 21, 2016
Posts
1,629
Location
Dorset
First Name
William
What tool are you using? If you use a skew chisel then you shouldn’t need to do too much sanding. A quick sand with the lathe on but not running too fast then stop the lathe and sand with the grain.
In wood working terms turners are the worst for sanding against the grain! :whistling:
 

21William

Fellow
Joined
Jan 21, 2016
Posts
1,629
Location
Dorset
First Name
William
Carbide tools are fine to get you started and aren’t a bad choice for abrasive materials like acrylic. For wood though the skew chisel is hard to beat for a smooth finish straight off the tool. I personally like the Crown Rolled edge skews, 19mm is a good size for pens but you could go a bit bigger.

Crown Rolled Edge Skew Chisel | Stiles & Bates

But stay safe, You may benefit from some tuition before trying one on your own.


There are lots of videos on using the skew chisel on YouTube on all kinds of spindle work.
 
Warning! This thread has not had any replies for over a year. You are welcome to post a reply here, but it might be better to start a new thread (and maybe include a link to this one if you need to).
Top