• Thanks for visiting The Penturners Forum today.

    There are many features and resources that currently you are unable to see or access, either because you're not yet registered, or if you're already registered, because you're not logged in.

    To gain full access to the forum, please log in or register now. Registration is completely free, it only takes a few seconds, and you can join our well established community of like-minded pen makers.

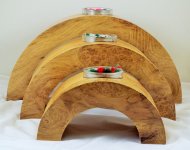
Another set with glass inserts

Woody

Registered
Joined
Jul 12, 2013
Posts
12,812
Location
at home
First Name
no
I thought Id better do a set with glass inserts before the H/S experts jump on me LOL made with 3" wide Robinia and finished with enamel lacquer these are on Violets request to keep the other half of the blank has made another set but that is still drying
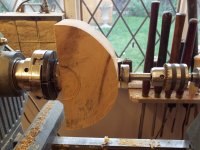
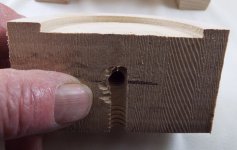
I have included a photo of how I drilled out for the candles the wood is atached to a screw chuck this is if you haven't got a pillar drill
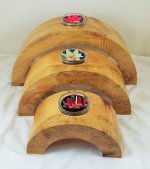
DSCF1270.JPGDSCF1271.JPGDSCF1268.JPG
 

Terry Q

Fellow
Joined
Oct 8, 2014
Posts
3,849
Location
Roanoke, Illinois USA
First Name
Terry
These are quite nice. Not familiar with Robinia. Does the color stay or will it darken? What is the diameter of the largest?
 

Woody

Registered
Joined
Jul 12, 2013
Posts
12,812
Location
at home
First Name
no
These are quite nice. Not familiar with Robinia. Does the color stay or will it darken? What is the diameter of the largest?

Hi Terry another name for the wood is black locust and it will darken a bit with time the diameter of the largest is 10 1/2" wide x 5 1/4" high
 

Buckeye

ペンメーカー
Executive Member
Joined
Oct 15, 2013
Posts
9,697
Location
UK
First Name
Peter
Another nice set:thumbs:

Peter
 

Dalboy

Executive Member
Joined
Mar 20, 2014
Posts
7,720
Location
Kent
First Name
Derek
These look great Woody the burr adds to the piece
 

Penpal

Grand Master
Joined
May 26, 2013
Posts
25,342
Location
Canberra AUSTRALIA
First Name
Peter
Hi Woody love the Robinia and method, finish do you cut the underside with bthe bandsaw and use a bobbin sander to finish underneath the curve?

Peter.:thumbs::thumbs::thumbs:
 

Woody

Registered
Joined
Jul 12, 2013
Posts
12,812
Location
at home
First Name
no
Hi Woody love the Robinia and method, finish do you cut the underside with bthe bandsaw and use a bobbin sander to finish underneath the curve?

Peter.:thumbs::thumbs::thumbs:

Hi Peter yes I cut on the bandsaw then I use the end of the belt sander to clean up the underside
 

PhillH

Little Grandad
Registered
Joined
Jun 18, 2013
Posts
3,436
Location
Solihull - A Tyke in Exile
First Name
Phill
Now I'm confused :sob:

I really thought I had it cracked as to how you'd made these, but seeing that shot of drilling it, that doesn't fit with how I had it in my head.

Put me out of my misery, how the hell did you make them.
 

Woody

Registered
Joined
Jul 12, 2013
Posts
12,812
Location
at home
First Name
no
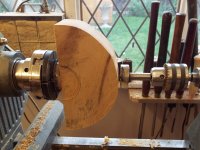
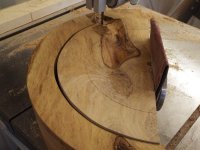
Hi phil the first stage is the same as making a bowl first fit to a screw chuck clean up the edge and one face and create a dovetail recess turn it around and fix to your chuck clean up the other side then using the tool rest put a line right across the middle then mark every 30mm three times around the blank then on the bandsaw to cut it in half now mark the centre of the flat and drill for your screw chuck and mount it back on the lathe to drill for the candle
DSCF1268.JPG
Or you can drill it on the pillar drill back on the band saw and cut the first 30mm off
DSCF1269.JPG
I then sanded both pieces of the block on the belt sander new outside edge on top of the belt underside edge on the end of the belt sander then back to drilling for the next candle and repeat this till finished the bit of sandpaper you can see in the second photo is just to square up the blank so the drill hit dead centre
This is what you are left with
DSCF1267.JPG
hope this helps mate good luck
 

PhillH

Little Grandad
Registered
Joined
Jun 18, 2013
Posts
3,436
Location
Solihull - A Tyke in Exile
First Name
Phill
Ah I was wrong then. I had in my head to do a s bowl then thin parting tool to create a circle. Like a big bangle I suppose.

Mount in cole jaws to sand inside then cut it in half, drill on pillar drill.

Would that work ?
 

Woody

Registered
Joined
Jul 12, 2013
Posts
12,812
Location
at home
First Name
no
Ah I was wrong then. I had in my head to do a s bowl then thin parting tool to create a circle. Like a big bangle I suppose.

Mount in cole jaws to sand inside then cut it in half, drill on pillar drill.

Would that work ?

Its a long way to go with a parting tool without making the cut wider than the tool to stop heat build up and to allow the wider part of the tool to enter the slot then your way would work
 
Top