• Thanks for visiting The Penturners Forum today.

    There are many features and resources that currently you are unable to see or access, either because you're not yet registered, or if you're already registered, because you're not logged in.

    To gain full access to the forum, please log in or register now. Registration is completely free, it only takes a few seconds, and you can join our well established community of like-minded pen makers.

At last but didn't read the instructions

Penpal

Grand Master
Joined
May 26, 2013
Posts
25,342
Location
Canberra AUSTRALIA
First Name
Peter
Very fine grain in the Lignum Pierre, I like the graduation from cap to body in the design. I have no knowledge of the accent rings so they look OK to me.

Peter.
 

flexi

Executive Member
Joined
Sep 12, 2014
Posts
6,457
Location
Maidstone
First Name
mark
I didnt know they came with instructions....a tin of mints with the fountain pens....but i didnt find any instructions:funny::funny:
A very nice pen all the same thou...i might have chose the rhodium ring to complement the ali thou( which is very nice against the Lignum ):thumbs::thumbs:
 

Pierre

Fellow
Joined
Sep 2, 2015
Posts
1,022
Location
Southern Central France
First Name
Pierre
I didnt know they came with instructions....a tin of mints with the fountain pens....but i didnt find any instructions:funny::funny:
A very nice pen all the same thou...i might have chose the rhodium ring to complement the ali thou( which is very nice against the Lignum ):thumbs::thumbs:

You are right but since both were an experiment I hadn't got as far as looking at aesthetics, I just chose a Mistral and I then made a blank with aluminium in it to try. The instructions are downloadable on Phil's Beaufort ink website. The next one gets Thuya burl . As for the mints well you were lucky all I got was a Bock nib!!:wink:

PG
 

Phil Dart

Moderator
Executive Member
Joined
Nov 28, 2014
Posts
5,491
Location
Colebrooke, Devon
First Name
Phil
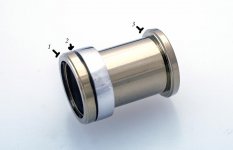
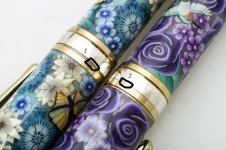
Oops - Nicely done though Pierre. You can always knock out the centre band and re-assemble it the right way round. I have spare thread inserts, so I can easily pop one on with your next parcel if you damage the original in the process.
 

Pierre

Fellow
Joined
Sep 2, 2015
Posts
1,022
Location
Southern Central France
First Name
Pierre
Oops - Nicely done though Pierre. You can always knock out the centre band and re-assemble it the right way round. I have spare thread inserts, so I can easily pop one on with your next parcel if you damage the original in the process.
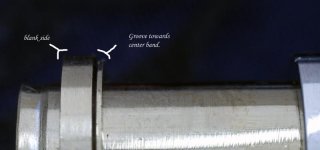
Thaks Phil but don't worry it already has a potential customer who is trying to wheedle it out of her husband!!

PG
 

EStreet

Registered
Joined
Jan 12, 2015
Posts
289
Location
USA
First Name
Ed
IMG_8161.jpg

IMG_8210.jpg

IMG_8149.jpg

This is one of the reason I posted this problem in my review. This is one of those areas that makes you pay attention to details, and all pen kits have some gotcha area.

However fear not, you can disassemble the upper cap and fix the problem. It's not that difficult either if you have the right items.


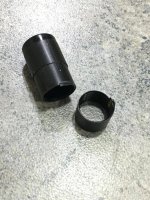
  • Use a TUBE like a slimline that is LONGER than the upper tube, put the tube inside the upper barrel then tap it out either by a hammer (least effective) or by tapping it on something (most effective).

  • Once the cap is off you can press out the threaded insert, dont' do a FUBAR like I did and have to replace the insert!

13647179_10206599182600165_817053157_o.jpg

  • Several methods you can use to get that insert out. One of them is use the lower coupler which is a perfect fit (assuming the trim ring is detachable) and press it out with a pen press. Other methods involve making a mold out of thermo plastic that you can melt in boiling water and form to shape. The goal is to fully support the thread then it will press out easy. Using the lower threaded couple that is epoxied onto a tube with OUT the trim ring you can easily screw it in place and just press it out, easy pleasy.

  • Once the insert is out you can use a screw or a turned block of wood to act as a buffer, something to fit inside the tube and on the edge of the center band so you can press it out. I have taken screws with nuts and turned them round on the lathe to use as an insert before. Also other pen kit tubes works just as well.
 

EStreet

Registered
Joined
Jan 12, 2015
Posts
289
Location
USA
First Name
Ed
Oh and P.S. one saying we have over here in the states is "I threw out the instructions, they were all written in Chinese anyways" but I am pretty sure that was not the case here :):funny:
 

Penpal

Grand Master
Joined
May 26, 2013
Posts
25,342
Location
Canberra AUSTRALIA
First Name
Peter
Only in America we have a saying in our house. We have a daughter living in America now 16 yrs and another lived in Washington during 9/11 with a total of nearly 4yrs in the rarified atmosphere of the Australian Embassy.

I refer to deep fried Oreos, Pumpkin throwing competitions. All things highly unusual to our experiences.

In the pen world only Ed Street magnifying his masterpieces shows us by example what can happen when assembling a pen. I went back to normal sized viewing on Pierre,s pen where he said he missed the assembly in fact commenting
grr!! and I know he said recently on a forum post that he welcomes criticism that you have in good faith provided an answer to.

Welcome back Ed now show more of your carefully constructed pens you share with the most outstanding maker of blanks Toni .

Kind regards to you both. As well Pierre.

Peter.
 

EStreet

Registered
Joined
Jan 12, 2015
Posts
289
Location
USA
First Name
Ed
Hey now, don't be dissin on my deep fried oreo's! :) No seriously, I do read often but not as often as I want. We did post a few things today as well.
 
Warning! This thread has not had any replies for over a year. You are welcome to post a reply here, but it might be better to start a new thread (and maybe include a link to this one if you need to).
Top