• Thanks for visiting The Penturners Forum today.

    There are many features and resources that currently you are unable to see or access, either because you're not yet registered, or if you're already registered, because you're not logged in.

    To gain full access to the forum, please log in or register now. Registration is completely free, it only takes a few seconds, and you can join our well established community of like-minded pen makers.

Badly behaved bandsaw - won't cut straight!

MrJoshua

Full Member
Joined
Mar 24, 2015
Posts
100
Location
United Kingdom
First Name
Jim
Hi guys

A couple of years back I got a really cheap 'Power' brand bandsaw from B&Q (£50 - their own brand basically, but a clone bandsaw that goes by many brands like draper, sealey etc).

I've tolerated it until now being generally crap because it just was needed to cut stuff without any degree of accuracy but now I'm more into wood work, turning, and making pens etc I need to make it cut straight so I can get some accuracy (specially because I want to try things like celtic patterns etc!!).

I watched some youtube videos on tuning these machines up and had already adjusted it to a point where I thought I couldn't do a lot else with it. Some videos feature a machine with a missing tyre on the drive wheel, fixed with electrical tape, and producing miraculous results. Not here - it has both its tyres.

One thing that won't have helped is the thin blades and while meddling this evening the blade exploded (too much tension on it), so I've bought some half inch ones, which will in theory help it cut straight.

Basically, if I use the fence (or not) to cut a straight parallel line, the blade begins to pull to one side and try to cut a curve. I'm not sure the primary reason for this, so hoping you guys might have ideas?

Here's the wretched thing:

62FE49BA-3920-4147-B41F-A75022DD61A6_zps73r5pw9y.jpg


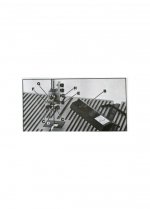
Here's some more reasons why it's horrible - the blade guides aren't nice bearings (besides a thrust bearing behind) for it to roll over, and actually apply direct contact to keep it from twisting, but are little metal pegs which you can't set too close or you risk catching the blade weld and snapping it. Or just adding friction etc. So They don't much help.

2B5401FB-8509-4B45-B13C-7C216BCEE5CB_zpspjitupwz.jpg


Now one issue I've noticed is that while I can adjust where the blade tracks on the top wheel, it always sits on the outside edge (not exactly hanging off, but nowhere near centre) on the bottom (drive) wheel.
Not sure why this is. I would have assumed that adjusting the top would 'pull' it into position on the bottom too. But it doesn't.

This makes me think drive wheel must be sitting closer in against the machine body than the top wheel, ie they're not aligned to each other. Maybe I can shim one of them t correct this or something?

I'm not sure if this would cause the blade to twist when it cuts though - any ideas on this?

What I'd like to ideally do (besides invest in a bigger, better quality machine) is to fit proper bearings for the blade guides top and bottom, so I'll have to design and machine something suitable if I can do.

Any other obvious reasons that would cause a saw like this to cut badly though and for the blade to want to twist as it cuts?

Thanks for any useful ideas folks. :)
Jim
 

Bigblackdog

Registered
Joined
Dec 28, 2014
Posts
839
Location
Leeds
First Name
Mark
put a decent blade on and try again. make sure it doesnt have too many teeth- 3 should be in the wood at a time, so 3-4 TPI for 1" thick (you dont get so many blades with less than 3tpi, so worry about that if you are cutting thicker stuff).

make sure that the tension is correct- too much tension can be as bad as too little, although I dont really know why. The guides are ok, but you could replace them with Lignum vitae ones if you desire. bearings are probably better, but these are not what is causing your issues.

Dont worry where the blade is on the bottom wheel. They should be set right, and you open up a lot of pain if you start tweaking them before you fully understand it.

I would stake a fiver that your issue will be due to the blade. if you need blades, tuffsaws have been the best that I have had, both price and quality.
 

Jim

Grand Master
Joined
Oct 19, 2011
Posts
15,616
After setting up my new bandsaw at Christmas i had the same issues Jim, i double checked all the alignments etc and still same, i changed the blade which came with it and problem solved?
 

Lons

Fellow
Joined
Dec 17, 2013
Posts
4,761
Location
Northumberland
First Name
Bob
Yep, change the blade for a quality one as your first option. +1 for Tuffsaws.

As an aside, most bandsaws track a bit and whilst this won't affect freehand cutting, you would need to adjust the guide to the blade or it will not cut straight. Look it up on YouTube, plenty of videos and it isn't difficult to shim out the guide fence.

edit: here's a link to one https://www.youtube.com/watch?v=IZThUPOr_Ug
 

MrJoshua

Full Member
Joined
Mar 24, 2015
Posts
100
Location
United Kingdom
First Name
Jim
Thanks guys - appreciate the input. I've got a set of 4 blades coming that are 4TPI 1/2" ones, so deeper than the 8mm one that was on it until a few hours ago.

I'm really curious about this though and I hope someone will help me understand, it seems common people suggesting that it's often a 'bad' blade that can cause this, and I accept that from the number of people who say that, but what is it about a blade itself that would cause it to either work well in respect of twisting like this one was doing, or running nice and straight? I realise you get good & bad quality products of course, but what physical thing is it about a blade that would mean it goes off on one like this instead of running true?

I know most people will be happy enough with "Don't honestly know, but they just sometimes do", but if someone know's I'm just interested to understand why.

Cheers :)
 

Penpal

Grand Master
Joined
May 26, 2013
Posts
25,342
Location
Canberra AUSTRALIA
First Name
Peter
Such an open ended question how long is a piece of string.

Step 1. Remove the table then stretch a string between the the top wheel and the bottom with the string just touching the top wheel top and bottom it should align with the lower wheel at the same time top and bottom. Having removed the guides top and bottom at the same time as the table. Check there is not play in the two main wheels. Alignment is critical. Tension guides must run true.

I would modify the throat pins by opening the gap to allow two bearings in place of the pins often you can buy after market guides and modify these to fit your saw. Replace the rearbearing that prevents the blade being pushed back from the vertical set it with a small clearance ensure it is right angles to the blade.

Never adjust the side guides unless you can turn the saw wheels around by hand to ensure they are seated best on the blade.

Sorry was about to write a manual for bandsaws but I do believe there are excellent books, videos etc devoted to the bandsaw.

About now its time to narrow down from United Kingdom addy you may find a wood group near you they have libraries your local library may have a craft / woodwork section. There is no magic bullet just patient alignment. One of the worlds best operators bandsaw was average in manufacture but cut thousands of disks for bowls etc but was properly aligned.

Anyway starting from the beginning straightedge the wheels long steel rule is cheap and effective just imagine a car out of alignment . Look for someone who is familiar with bandsaws never give up Jim. I have bought several books on bandsaws never regretted the money spent on them.

Peter.:thumbs::thumbs:
 

Tephy

Full Member
Joined
Oct 14, 2014
Posts
199
Location
Suffolk
First Name
Steve
I had the same problem, and like others here a new blade cured it . I was told that once a bandsaw blade has been used to cut a curve it will never cut straight again, I don't know if this is just an old wives tale but have 2 blades one for cutting curves one for straight cuts and everything runs fine ... I do tune my blades before use as well

Good luck
 

Jimjam66

Chief Battonager
Registered
Joined
Jan 27, 2013
Posts
3,774
Location
Basingstoke, Hampshire
I'm not sure how abused your blade has been, but I can tell you that my blade started to pull to one side because the 'set' on the opposite teeth had been stuffed by running the blade against the fence. Yes, some idiot had brought the fence up too close and basically flattened the teeth on one side so the blade only had a set on the other side. (Gotta stop letting other people use my stuff - oh wait! I don't ... Whoops! must have been me then ...:rolling:)

Once it was like that i could cut all the wedges you would ever need, and a new blade was the only cure.
 

Phil Dart

Moderator
Executive Member
Joined
Nov 28, 2014
Posts
5,542
Location
Colebrooke, Devon
First Name
Phil
Yep, change the blade for a quality one as your first option. +1 for Tuffsaws.

As an aside, most bandsaws track a bit and whilst this won't affect freehand cutting, you would need to adjust the guide to the blade or it will not cut straight. Look it up on YouTube, plenty of videos and it isn't difficult to shim out the guide fence.

edit: here's a link to one https://www.youtube.com/watch?v=IZThUPOr_Ug
Jim - Lons has it in a nutshell - there is not a bandsaw nor a blade in the world that cuts straight, they all drift. The only difference is that a cheap and nasty blade may drift more than a more expensive one.

The excercise in Lons' video is something you have to do every time you change the blade. The only thing I would add is that once you've made your freehand cut, clamp the wood to the table rather than draw a line, then bring up the fence and adjust it to the wood - much more accurate that way.

Phil
 

donwatson

Fellow
Joined
May 27, 2014
Posts
2,714
Location
Glenrothes, Fife
First Name
Donald
Jim,
I have had a look at the manual to refresh my memory.
saw.jpg
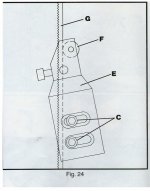
Unlock the cap screw H, and move the bearing and shaft backwards out the road.
Unlock the cap screws C and move the guide pins to the sides, out the road.
Unlock the cap screw E and move the guide black backwards out the road.
This should clear all the obstacles on the top and the blade should run freely.
This should only take a couple of minutes and gives me time to create the second bit of the set up.

take care
Don W
 

donwatson

Fellow
Joined
May 27, 2014
Posts
2,714
Location
Glenrothes, Fife
First Name
Donald
Hi Jim,
Here is the part beneath the table.

bottom_guide.jpg
Again loosen 2 cap screws holding the pins and open them wider.
Loosen the cap screws C and move the bracket back ( the bearing is fixed on this bracket and this is te only way to set it up.

Now that everything is free.
** Make sure the power is OFF and remove the plug from the socket.**
Start to tension and line up the blade.

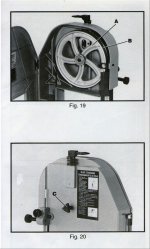
Top_wheel.jpg

Loosen the 2 capscrews (yours may have only 1) on the top wheel slide They are in the oval recess shown at the top of the wheel.
Tighten the blade to the recommended tension and turn the top wheel by hand, carefully, it is easy to catch fingers.
I usually stick a screwdriver through the spokes, not too far, it will get caught.
Once you have the wheels and blade spinning merrily, you can use the triangular shaped handle on the back ( C in Fig.20. ) to position the blade.
When that is running to your satisfaction, bring the lower guide block forward until the bearing is just clear of the blade, nip the screws C.
Now push one guide pin in just clear of the blade, (You can push it in and use a 0.010" feeler gauge if you wish) and lock with the cap screw.
Run the top wheel again to check the pin is not pushing the blade.
Repeat with the other pin. Then loosen the screws C and adjust the bracket so that the pins sit just behind the teeth of the blade and the bearing sits just behind the back of the blade. Tighten screws C.
Finally the top guide, Loosen screw E and bring the whole block forward until the pins are just behind the teeth again. Tighten screw E.
Push a pin in until it just clears the blade, check by turning the top pulley, adjust the other pin and lock the screws C.
Now the bearing G is brought forward by loosening screw H, this screw holds the bearing in position IN 2 WAYS.
The first thing is to move the shaft and bearing forward until it is just clear of the blade.
Then at the rear of the shaft is a screwdriver slot, the bearing is set on an eccentric and this slot enables you to move the bearing so that ONLY THE VERY OUTER EDGE OF THE BEARING IS IN CONTACT WITH THE BLADE. THIS SETTING IS VERY IMPORTANT.
Run the top wheel and check all is ok. Tighten cap screw H.
Job done, close up machine, plug in to electrical socket, switch on. seeemples :thumbs:
Any problem let me know, this way the machine is set up properly and you can then have a look at the video instructions (which are very good)
 

Grump

Grand Master
Joined
Aug 17, 2013
Posts
10,510
Location
Stevenage
First Name
Brian
Thanks for that Don, e needs the damn thing set up properly before seeing how far it wanders and looking at his pics the guides are right at the back.
 

Woody

Registered
Joined
Jul 12, 2013
Posts
12,811
Location
at home
First Name
no
As Brian and Don said also pushing the wood through instead of feeding it will cause the same problem set up then ease up
 

donwatson

Fellow
Joined
May 27, 2014
Posts
2,714
Location
Glenrothes, Fife
First Name
Donald
Thanks for that Don, e needs the damn thing set up properly before seeing how far it wanders and looking at his pics the guides are right at the back.

Thanks Grump. :thumbs: It was the first thing I noticed from the picture, that made me suspect he should start at the beginning.
 

MrJoshua

Full Member
Joined
Mar 24, 2015
Posts
100
Location
United Kingdom
First Name
Jim
I had the same problem, and like others here a new blade cured it . I was told that once a bandsaw blade has been used to cut a curve it will never cut straight again,

This is quite interesting actually because I can see how adding tension & force a certain way could change the blade ever so slightly as to cause a subsequent problem. I have tried turning radii tighter than I ought to have done but in terms of 'abuse' that's about as much as you could say really. It's not really had a hard life at all.

Anyway - thanks for all the replies gents - super helpful as usual and very much appreciated.
Peter, I think the two main things I will be looking at tonight on it (since I have no blade now) are the alignment of the wheels to each other, and to fabricate fittings to allow bearings either side top & bottom. I think the smallest ones I have a stock of take an M6 bolt through, so will see what I can do with those. Might have to make little adaptor brackets.

Part of the reason is I want to try celtic knots and out of my chopsaw, horrific table saw, and bandsaw, I think the latter has the best chance of being suitable for making a clean accurate cut. The kerf will be very thin so it could interesting trying to make suitable slivers of wood to glue in the slots, but if it's on a jig or something I can always make more than one cut to get the correct thickness or something.

Sure it'll never be brilliant but with some tweaking and patience along with the advice here I'm sure I can get it fairly ok, and there's not much hope of saving up for a bigger better one at all, so make the best of what I have of course. :)


Write your reply...
Warning! This thread has not had any replies for over a year. You are welcome to post a reply here, but it might be better to start a new thread (and maybe include a link to this one if you need to).
Top