• Thanks for visiting The Penturners Forum today.

    There are many features and resources that currently you are unable to see or access, either because you're not yet registered, or if you're already registered, because you're not logged in.

    To gain full access to the forum, please log in or register now. Registration is completely free, it only takes a few seconds, and you can join our well established community of like-minded pen makers.

Casting labels in Clear blanks

wobblybootie

Apprentice Member
Joined
May 18, 2013
Posts
4
I have scoured IAP for information and am now suffering brain freeze!! :eeeeek:

The amount of varying products used is mind boggling. Different Avery labels, different sealing methods and materials, Modge Podge, CA, Resin etc etc etc etc ...

Translating American products to what is available here in Jollie Olde UK is bad enough but ... :rolling:

Has anyone successfully cast a workable blank? If so, how did you do it? and could you repeat the process with acceptable results??

Frustrated of Dorset ...
 

wobblybootie

Apprentice Member
Joined
May 18, 2013
Posts
4
An interesting and novel idea ... I have molds, kits and casting resin. I was / am hoping for clarification on label and 'fixative' Ah well, I shall report back on my efforts with photos (if I remember to take them).
 

rowdyyates115

It's Showtime.....
Fellow
Joined
Jun 22, 2013
Posts
2,156
Location
Portsmouth, UK
Yes please do report and pass on any info, as I have been asked to make a few pens with company logo labels in clear resin, they also want different coloured backgrounds. So any tips would be gratefully received.......:bwink:
 

Penpal

Grand Master
Joined
May 26, 2013
Posts
25,342
Location
Canberra AUSTRALIA
First Name
Peter
Suggestion in answer to your query recently while googling aimlessly I found my mate Les Elm from Canada has a new line displayed on Family Woodturning Forum where he places pics of various fish on pens with incredible clarity and superb finish with labels as he does on everything he sets out to do. He has a very tight covering in sales at Gun Shows, Fishing Shows. Have a gaze on his Library contributions on the IAP there he has placed a number of very informative articles in depth covering casting etc. Bear in mind great operators like Les spend inordinate hours developing technique and like using a tap sometimes the info is available sometimes not. IMHO he is a master of many WW ideas and innovations, Scroll Saw Master for fun he makes working wood locks and keys. His workshop is huge attached to his house and large enough to envelop my house. It is immaculate in line with everything he produces. When he casts he does not need to vibrate or use pressure or vacuum, no bubbles this he explains as well as a variety of home made heating device he uses for casting to maintain top using temperature. He lives in Calgary where temps are fearful from time to time. Appropro recent discussions on how to display pens for home and shows on the IAP from time to time Les shows pics etc of what he makes to display and keep his pens again I stress he does everything himself. Even his fathers really old drillpress the restoration he made was clinical he went into that one time on the IAP.

Have success Peter.:goesred:
 

Wennthepen

Apprentice Member
Joined
Sep 15, 2013
Posts
44
Location
Somerset
I do it like this

Hi, I cast pen 'labels' regularly daily probably and I make them in a computer paint program, I use Neopaint but others are available. For instance a Sierra pen needs a label 211 pixels X 137 pixels. I print the design/badge onto ordinary white printing paper on the computer printer. Cut the badge out with a craft knife and use CA glue to roll it onto the tube.TIP: If the label has white in it use a black painted tube as the glue sometimes lets the brass of the barrel show through. Once on the tube use hairspray (I bought my own) to spray it to seal the paper. Fill the tube with weights, I use plasticine and pop the stoppers in the ends. I cast with 'water clear polyester resin' in a small oblong mould which is big enough to take 2 tubes at a time. I mix enough resin to cover the bottom of the mould to about 1/4" and leave it set overnight. Next day lay the 2 tubes on the set resin equispaced and pour more resin to cover them half to 3/4 of the way up the tube. Clear any bubbles with a craft stick. loosely cover and leave overnight again. Next day repeat but cover the tubes to about 1/4" above. Again remove any bubbles. I then leave for 48hrs before I remove/cut and turn them. This negates using a pressure pot and although it takes a while the results are most satisfactory. Hope this helps...if I can help further come back to me.....happy casting
 

Jim

Grand Master
Joined
Oct 19, 2011
Posts
15,617
Thanks for this WTP, and a warm welcome to the forums, do you have any pictures to show us of your finished pens BTW ... :thinks:
 

edlea

Lobbygobbler
Registered
Joined
Aug 1, 2013
Posts
4,693
Location
Blackpool
First Name
Ed
Hi, I cast pen 'labels' regularly daily probably and I make them in a computer paint program, I use Neopaint but others are available. For instance a Sierra pen needs a label 211 pixels X 137 pixels. I print the design/badge onto ordinary white printing paper on the computer printer. Cut the badge out with a craft knife and use CA glue to roll it onto the tube.TIP: If the label has white in it use a black painted tube as the glue sometimes lets the brass of the barrel show through. Once on the tube use hairspray (I bought my own) to spray it to seal the paper. Fill the tube with weights, I use plasticine and pop the stoppers in the ends. I cast with 'water clear polyester resin' in a small oblong mould which is big enough to take 2 tubes at a time. I mix enough resin to cover the bottom of the mould to about 1/4" and leave it set overnight. Next day lay the 2 tubes on the set resin equispaced and pour more resin to cover them half to 3/4 of the way up the tube. Clear any bubbles with a craft stick. loosely cover and leave overnight again. Next day repeat but cover the tubes to about 1/4" above. Again remove any bubbles. I then leave for 48hrs before I remove/cut and turn them. This negates using a pressure pot and although it takes a while the results are most satisfactory. Hope this helps...if I can help further come back to me.....happy casting

That sounds easy enough for me to have a go..Thanks and welcome to the forums.
 

rowdyyates115

It's Showtime.....
Fellow
Joined
Jun 22, 2013
Posts
2,156
Location
Portsmouth, UK
Hi, I cast pen 'labels' regularly daily probably and I make them in a computer paint program, I use Neopaint but others are available. For instance a Sierra pen needs a label 211 pixels X 137 pixels. I print the design/badge onto ordinary white printing paper on the computer printer. Cut the badge out with a craft knife and use CA glue to roll it onto the tube.TIP: If the label has white in it use a black painted tube as the glue sometimes lets the brass of the barrel show through. Once on the tube use hairspray (I bought my own) to spray it to seal the paper. Fill the tube with weights, I use plasticine and pop the stoppers in the ends. I cast with 'water clear polyester resin' in a small oblong mould which is big enough to take 2 tubes at a time. I mix enough resin to cover the bottom of the mould to about 1/4" and leave it set overnight. Next day lay the 2 tubes on the set resin equispaced and pour more resin to cover them half to 3/4 of the way up the tube. Clear any bubbles with a craft stick. loosely cover and leave overnight again. Next day repeat but cover the tubes to about 1/4" above. Again remove any bubbles. I then leave for 48hrs before I remove/cut and turn them. This negates using a pressure pot and although it takes a while the results are most satisfactory. Hope this helps...if I can help further come back to me.....happy casting

Sounds good to me, will give it a go soon.. Cheers, thanks for checking this out :thumbs:... any photos?
 

Jim

Grand Master
Joined
Oct 19, 2011
Posts
15,617
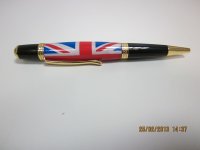
Now that is a smart way of making a pen look good WTP, this may inspire a few of us to follow your tip on how you do this .. Great looking pen ... Thanks for sharing, i wouldn't worry to much about your images, they look good to me .. :wink:
 

rowdyyates115

It's Showtime.....
Fellow
Joined
Jun 22, 2013
Posts
2,156
Location
Portsmouth, UK
Thats brilliant.... All from a computer printout - 'fantastic'
Printing, Casting, Soldering, Glueing, so much to do. Not enough hours in a day - it's great in'it....:banana::banana:

Am I losing it or have I lost it ... ... LostWhat? :whistling::whistling:
 

rowdyyates115

It's Showtime.....
Fellow
Joined
Jun 22, 2013
Posts
2,156
Location
Portsmouth, UK
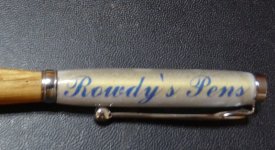
Spent the last couple of days having a go at casting clear resin blanks with a (Text) labels. Takes a long time and then I only managed to get one out of 5. The resin bled into 4 of the labels and they became unreadable. Managed to get the best one turned up and installed on a pen.
I need to find some way of sealing the labels before casting, I used hairspray but maybe I need to use more. The rest of the process is quite simple but is very time consuming.
Could be quite useful...

2013-09-21 23.40.05.jpg
 

edlea

Lobbygobbler
Registered
Joined
Aug 1, 2013
Posts
4,693
Location
Blackpool
First Name
Ed
Spent the last couple of days having a go at casting clear resin blanks with a (Text) labels. Takes a long time and then I only managed to get one out of 5. The resin bled into 4 of the labels and they became unreadable. Managed to get the best one turned up and installed on a pen.
I need to find some way of sealing the labels before casting, I used hairspray but maybe I need to use more. The rest of the process is quite simple but is very time consuming.
Could be quite useful...

View attachment 1854

Brilliant for a first one mate .:thumbs:
 
Warning! This thread has not had any replies for over a year. You are welcome to post a reply here, but it might be better to start a new thread (and maybe include a link to this one if you need to).
Top