• Thanks for visiting The Penturners Forum today.

    There are many features and resources that currently you are unable to see or access, either because you're not yet registered, or if you're already registered, because you're not logged in.

    To gain full access to the forum, please log in or register now. Registration is completely free, it only takes a few seconds, and you can join our well established community of like-minded pen makers.

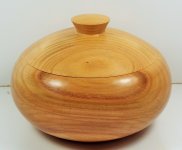
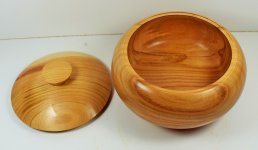
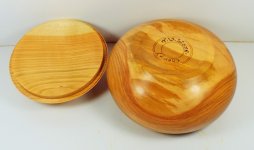
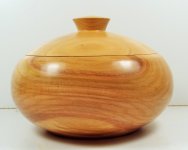
Cherry box

Woody

Registered
Joined
Jul 12, 2013
Posts
12,812
Location
at home
First Name
no
Made this Cherry box today from two bits of the wood a facebook friend sent me it is 5" x 4 1/2" with a polish finish thank you Roger for the pleasure of turning it also all the reverse chucking was done on Brian's cole jaws thank you Brian on a lathe with a chuck my beloved gave me wow aint I the luck one and all I can give in return is my love and friendship God bless you all 1.JPGDSCF1439.JPGDSCF1441.JPGDSCF1444.JPG
 

Dalboy

Executive Member
Joined
Mar 20, 2014
Posts
7,720
Location
Kent
First Name
Derek
WOW Woody very nice. I love turning cherry and after a while it turns a lovely colour as it darkens a bit
 

brody2123

Fellow
Joined
Feb 13, 2014
Posts
3,058
Location
redditch
First Name
Brody
That's a cracking job mate. Beautiful timber too. And shapeed and finished perfectly. :thumbs:
 

Woody

Registered
Joined
Jul 12, 2013
Posts
12,812
Location
at home
First Name
no
Wonderful Woody, and I'm staring at it trying to figure out how to go about making something similar.

Hi Ray the bowl part was made in the same manner as a standard bowl the lid was first mounted on a faceplate to create the bottom and the spigot to fit in the bowl remove the face plate then remount the bowl fit the lid in it bring up the tail stock then complete the top of the lid to match the shape of the bowl and make the knob which will have a bit that the tailstock has marked now reverse mount the lid if you have some button jaws and clean up the top of the knob if you dont have any button jaws then clean up the knob with a chisel I also reversed the bowl and removed the dovetail recess hope this helps mate happy turning
 

rayf6604

Registered
Joined
May 1, 2014
Posts
2,726
Location
Narrowboat dweller Willington, Derby
First Name
Ray
Hi Ray the bowl part was made in the same manner as a standard bowl the lid was first mounted on a faceplate to create the bottom and the spigot to fit in the bowl remove the face plate then remount the bowl fit the lid in it bring up the tail stock then complete the top of the lid to match the shape of the bowl and make the knob which will have a bit that the tailstock has marked now reverse mount the lid if you have some button jaws and clean up the top of the knob if you dont have any button jaws then clean up the knob with a chisel I also reversed the bowl and removed the dovetail recess hope this helps mate happy turning
Hi Woody yes that explains it. I have a lump of spalted beech 7in dia by 4in I was hoping to make a box with, and I had in mind to make the whole thing from that piece but maybe I should make the lid separately?
 

Buckeye

ペンメーカー
Executive Member
Joined
Oct 15, 2013
Posts
9,697
Location
UK
First Name
Peter
It's a lovely box, lovely finish:thumbs:

Peter
 

Penpal

Grand Master
Joined
May 26, 2013
Posts
25,342
Location
Canberra AUSTRALIA
First Name
Peter
Neat little turned box Woody the hollowing out is smooth and deep like the fitted lid the Cherry timber is cheeky with great design colour mellow.Will look great on display anywhere mate .

Peter.:thumbs::thumbs::thumbs:
 

Treeesa

Graduate Member
Joined
Oct 5, 2014
Posts
855
Location
Berkshire
First Name
Andy
Lovely bit of Art Woody Thanks for explaining, will print it off and save for when I really know what I'm doing. Beautiful :thumbs::thumbs:
 

paulm

grave manibus faciendum
Registered
Joined
Oct 7, 2013
Posts
12,046
Location
Sandford
First Name
Paul
Beautiful Woody, its a perfect box as I have come to expect from you :thumbs:
 
Top