Macman
Apprentice Member
- Joined
- Jul 9, 2013
- Posts
- 9
Hi all,
So I finaly got round to trying the decals using the waterslide decal paper I bought.
Here is my experience. I turned a Cigar pencil in Oak and a European pen in Walnut.
I turned the pen and sanded as I normally do and then applied a coat of CA to seal the wood. printed the lettering off, and followed the decal paper instructions. Applied the decal as per the instructions and as it said to leave for 3 hours or more I left them overnight.
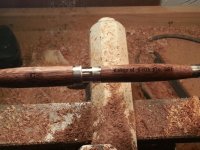
On the Walnut pen below, which was the first one, I cut the decal out leaving a bit of room, assuming that with it being transparent it would not matter, I was wrong.On the finnished pen you can clearly see the decal background which looks matt compared to the rest of the finish and the black lettering is hard to make out on the walnut, although it looked fine before applying the finish.. There is no picture of the finished pen but I will get to that shortly!

I cut the decal for the oak one much closer to the lettering but you can hardly see the decal background so I think it looks better on the oak anyway.
Both were then given about 6 more coats of CA. I then decide to buff the finish as I normally do - big mistake. The logo on the oak pencil came off and on the walnut pen it raised the edge of the decal, as the lettering was too dark I decided to take it off the walnut pen and will try light coloured text.
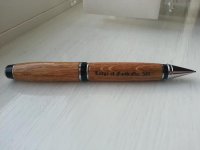
Here is the finished oak pen, which was buffed very gingerly but survived.


So to sum up what I learned. The process of printing and making the decals is straight forward, as is applying them. The real issue is with how they look on a particular wood. This will be less of an issue if you can trim off most of the non printed part of the decal.
Finally if you use ca you will probably be better adding a lot more than I did, particularly if you want to buff it.
Hope that helps anyone considering giving it a go.
Macman
So I finaly got round to trying the decals using the waterslide decal paper I bought.
Here is my experience. I turned a Cigar pencil in Oak and a European pen in Walnut.
I turned the pen and sanded as I normally do and then applied a coat of CA to seal the wood. printed the lettering off, and followed the decal paper instructions. Applied the decal as per the instructions and as it said to leave for 3 hours or more I left them overnight.
On the Walnut pen below, which was the first one, I cut the decal out leaving a bit of room, assuming that with it being transparent it would not matter, I was wrong.On the finnished pen you can clearly see the decal background which looks matt compared to the rest of the finish and the black lettering is hard to make out on the walnut, although it looked fine before applying the finish.. There is no picture of the finished pen but I will get to that shortly!

I cut the decal for the oak one much closer to the lettering but you can hardly see the decal background so I think it looks better on the oak anyway.
Both were then given about 6 more coats of CA. I then decide to buff the finish as I normally do - big mistake. The logo on the oak pencil came off and on the walnut pen it raised the edge of the decal, as the lettering was too dark I decided to take it off the walnut pen and will try light coloured text.
Here is the finished oak pen, which was buffed very gingerly but survived.


So to sum up what I learned. The process of printing and making the decals is straight forward, as is applying them. The real issue is with how they look on a particular wood. This will be less of an issue if you can trim off most of the non printed part of the decal.
Finally if you use ca you will probably be better adding a lot more than I did, particularly if you want to buff it.
Hope that helps anyone considering giving it a go.
Macman
Last edited:

