• Thanks for visiting The Penturners Forum today.

    There are many features and resources that currently you are unable to see or access, either because you're not yet registered, or if you're already registered, because you're not logged in.

    To gain full access to the forum, please log in or register now. Registration is completely free, it only takes a few seconds, and you can join our well established community of like-minded pen makers.

Got drilling and polishing clear acrylic licked ...

Jimjam66

Chief Battonager
Registered
Joined
Jan 27, 2013
Posts
3,775
Location
Basingstoke, Hampshire
I thought those of you who are interested in making a demonstrator might benefit from my learning over the last few days. After three attempts at drilling I realised that heat is a killer - the heat from the drill bit actually causes the acrylic in close proximity to bubble, then the bubble walls sand away while you're polishing and you're left with pitting. :down:

So I tried drilling with flood irrigation - sounds fancy, doesn't it? This is what it looks like:
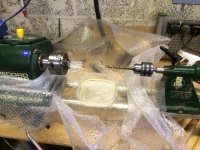
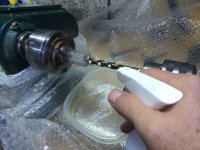
photo 4.JPG

photo 3.JPG

The results are astounding - i started sanding (wet) from 400 grit, but probably could have started from 600 grit. The result speaks for itself:
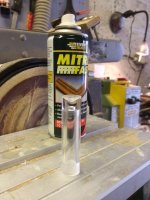
photo 5.JPG

:thumbs::thumbs::thumbs:
 

edlea

Lobbygobbler
Registered
Joined
Aug 1, 2013
Posts
4,693
Location
Blackpool
First Name
Ed
Knew you'd crack it eventually David ...Now I can't wait to see that Demonstrator. Bring it on

:banana::banana::banana::banana::banana::banana:
 

Grump

Grand Master
Joined
Aug 17, 2013
Posts
10,510
Location
Stevenage
First Name
Brian
Stunned !!!! Well done that man init?
George would be proud of ya for that one.:tongue::tongue:
 

Buckeye

ペンメーカー
Executive Member
Joined
Oct 15, 2013
Posts
9,697
Location
UK
First Name
Peter
David, that looks good. I have found that using split point drill bits cuts a lot cooler, they have been a revelation for me with drilling, so now I convert all my drill bits to split point.

Peter
 

Jimjam66

Chief Battonager
Registered
Joined
Jan 27, 2013
Posts
3,775
Location
Basingstoke, Hampshire
David, that looks good. I have found that using split point drill bits cuts a lot cooler, they have been a revelation for me with drilling, so now I convert all my drill bits to split point.

Peter

Interesting, Peter! I had never heard of a split point bit before now. Do you use a drill doctor to split the points? It would be interesting to see if that was enough - acrylic is SOOOOO sensitive to heat ...
 

Buckeye

ペンメーカー
Executive Member
Joined
Oct 15, 2013
Posts
9,697
Location
UK
First Name
Peter
Yes, it's a fantastic machine and I can keep my bits sharp very easily, I have tried grinding them myself, but that is an art I am not good at.

Yes it is good enough to drill the clear acrylic without water although if it is easy to introduce water it will be quicker. When I did mine I drilled in about 1/2" took out the drill and felt the end, it was cool. I went in another 1/2" and out again, it was getting warm, but still cool enough. It is the next inch that is the problem so it is better to do 1/4" and withdraw and keep doing that until the end. When the bit is in quite deep it is harder for the swarf to travel down the flutes and that is when it heats up.

If you want to send me some bits I will put a split point on them for you, I don't have any spare bits or I would send some to you, but as I say send me some from about 4mm upto 12mm (maybe 13mm) and you can try them and just see the difference how cool they are.

Peter
 

Woody

Registered
Joined
Jul 12, 2013
Posts
12,812
Location
at home
First Name
no
Very well done David your a man of many talents I look forward to seeing the end results
 

Jim

Grand Master
Joined
Oct 19, 2011
Posts
15,617
Excellent David, i wish i could have got a bet on at Billy Hills that you would have cracked this little hiccup ... :thumbs:
 

Jimjam66

Chief Battonager
Registered
Joined
Jan 27, 2013
Posts
3,775
Location
Basingstoke, Hampshire
Thanks for all the kind comments, guys. I have done the cap, section and barrel so far, but being me I've decided to try a bulb filler so still need to do the back plug of the barrel (what the sac attaches to) and the blind cap. Not sure you can call it a blind cap if it's see-through, init Brian? THEN ... I have to modify the feed to allow the attachment of the breather tube and the air passage ... scared &^%$less by that one!

If you want to send me some bits I will put a split point on them for you, I don't have any spare bits or I would send some to you, but as I say send me some from about 4mm upto 12mm (maybe 13mm) and you can try them and just see the difference how cool they are.

Oh yes please, Sir!! PM me your address and I'll get them in the mail pronto.
 

Buckeye

ペンメーカー
Executive Member
Joined
Oct 15, 2013
Posts
9,697
Location
UK
First Name
Peter
Thanks for all the kind comments, guys. I have done the cap, section and barrel so far, but being me I've decided to try a bulb filler so still need to do the back plug of the barrel (what the sac attaches to) and the blind cap. Not sure you can call it a blind cap if it's see-through, init Brian? THEN ... I have to modify the feed to allow the attachment of the breather tube and the air passage ... scared &^%$less by that one!

I didn't know you had to add a breather tube, I need to read up more about it.

Peter
 

Jimjam66

Chief Battonager
Registered
Joined
Jan 27, 2013
Posts
3,775
Location
Basingstoke, Hampshire
I didn't know you had to add a breather tube, I need to read up more about it.

Peter

Peter, I'm following the IAP tutorial on this page. Nice and detailed, and loads of pics. Apparently the principle of the breather tube is that when you squeeze the sac air moves out of the breather tube more easily than ink moves out of the feed. Then when you release the sac both the feed and the air passage are under the ink, so ink gets drawn in to replace the air.
 

Buckeye

ペンメーカー
Executive Member
Joined
Oct 15, 2013
Posts
9,697
Location
UK
First Name
Peter
I think I have all the PDFs, what I haven't done is read them all. I have been preparing for the big plunge, buying taps and dies etc. and I am just about there, but I want some clear time without any distractions when I start.

Peter
 

Buckeye

ペンメーカー
Executive Member
Joined
Oct 15, 2013
Posts
9,697
Location
UK
First Name
Peter
I read through the pdf last night and I think I have to look at the feed a bit more, did you use a standard feed from a kit?

If it's special, i may just use a standard ink filler, until I have source one.

I know it isn't rocket science, but it did remind me of neurosurgery:winking:

Peter
 

Jimjam66

Chief Battonager
Registered
Joined
Jan 27, 2013
Posts
3,775
Location
Basingstoke, Hampshire
I read through the pdf last night and I think I have to look at the feed a bit more, did you use a standard feed from a kit?

If it's special, i may just use a standard ink filler, until I have source one.

I know it isn't rocket science, but it did remind me of neurosurgery:winking:

Peter

I know what you mean! I don't think there's anything special abou the feed, a kit one would do fine.
 

Buckeye

ペンメーカー
Executive Member
Joined
Oct 15, 2013
Posts
9,697
Location
UK
First Name
Peter
I know what you mean! I don't think there's anything special abou the feed, a kit one would do fine.

Okay, that's comforting, thanks.

Peter
 
Warning! This thread has not had any replies for over a year. You are welcome to post a reply here, but it might be better to start a new thread (and maybe include a link to this one if you need to).
Top