• Thanks for visiting The Penturners Forum today.

    There are many features and resources that currently you are unable to see or access, either because you're not yet registered, or if you're already registered, because you're not logged in.

    To gain full access to the forum, please log in or register now. Registration is completely free, it only takes a few seconds, and you can join our well established community of like-minded pen makers.

How we all do it…..

Garetine

Full Member
Joined
Jul 14, 2020
Posts
79
Location
Northern Ireland
First Name
Peter
Ok, so I’m not looking to find out anyone’s little secrets but it would be nice to know how my pen making process compares to other pen makers and might be a help to new pen turners.
We most likely follow a similar route to get our pens ready for sanding so we’ll take it as a given and start the discussion from there.
For me….
1,Depending on the finish of the tool I start from 180 or 240 sand paper.
2, I move through the grits up to 1000.
3, Then micro mesh 1500 to 12000, spending about 30 seconds on each grit.
4. I then polish with Poorboys Mastercut, Medium and Fine.
5, Lastly I finish with an acrylic wax stick and buff.
6. Pray don’t crack the blank on the press.

Anyone else care to share?
 

Hallelujahal

Graduate Member
Joined
Jan 5, 2023
Posts
728
Location
Lincolnshire
First Name
Alex
Below is generally how I roll for wood pens.

1. Sand to 600 then burnish with shavings
2.. Sanding Sealer then cut back if necessary before applying a coat of friction polish.
3. Either CA or Melamine laquer 6 to 8 coats
4. Micro mesh to 12000
5. Crystalline wax top coat
6. Pray bushings have not welded themselves to the blank!😆
 

flexi

Executive Member
Joined
Sep 12, 2014
Posts
6,515
Location
Maidstone
First Name
mark
I am generally the same as above, but with some quirks 😜😜(well it is me!)
Firstly after sanding with the lathe on I turn it off and sand along the blank to remove any ridges or deep rings...
I then wipe the blank over to remove ANY trace of grit, before moving to the next...
As a finish I tend to use melamine lacquer or Rubio (but after reading a report into it that might change)... Truoil for Walnut....
Before assembly I always run a snail countersink around the tubes and a flue brush through, then optically check... Its now saved loads of tubes from cracking blanks and takes moments...
 

Curly

Graduate Member
Joined
Nov 3, 2019
Posts
466
Location
RM of Aberdeen, Saskatchewan, Canada
First Name
Peter
Turn between centres with a skew and a digital calliper.
Sand with 320, 400, once in a blue moon 600, stopping the lathe to sand lengthwise for each grit.
A couple three coats of thin CA.
About 10 coats of medium CA.
Sand with 400 just enough to smooth and then #0000 steel wool, also stopping to sand/rub lengthwise.
Gently sand the end on 400 to ensure the CA is even to the tube. Reduces chances of cracking.
Beall three wheel buff. First around the blank. Then 45º to the left and then again to the right. Or if you prefer angled right then left. Finally lengthwise. Clean off the compound between each wheel to avoid contamination of the next wheel with coarse grit.
Assemble and be amazed at how good I am.

Pete
 

Neil

Fellow
Joined
May 21, 2013
Posts
3,137
Location
Hitchin, Hertfordshire
First Name
Neil
Ok, so I’m not looking to find out anyone’s little secrets but it would be nice to know how my pen making process compares to other pen makers and might be a help to new pen turners.
We most likely follow a similar route to get our pens ready for sanding so we’ll take it as a given and start the discussion from there.
For me….
1,Depending on the finish of the tool I start from 180 or 240 sand paper.
2, I move through the grits up to 1000.
3, Then micro mesh 1500 to 12000, spending about 30 seconds on each grit.
4. I then polish with Poorboys Mastercut, Medium and Fine.
5, Lastly I finish with an acrylic wax stick and buff.
6. Pray don’t crack the blank on the press.

Anyone else care to share?
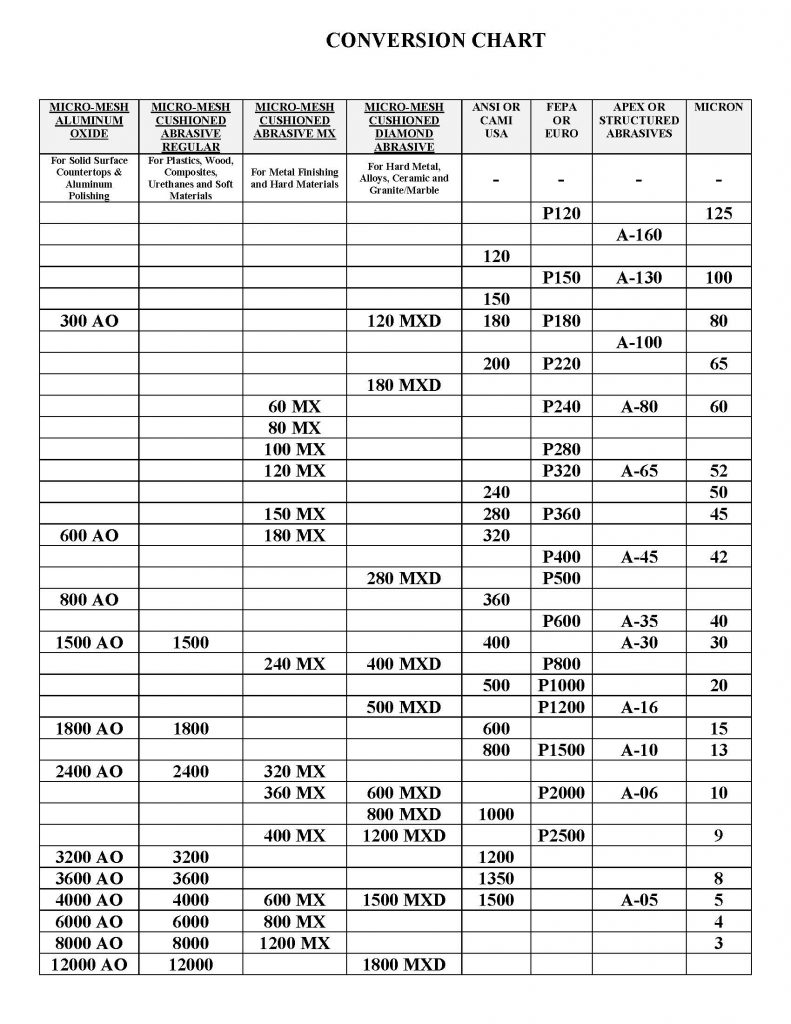
Peter, the micromesh grades are not measured on the same scale as “normal” sandpaper. The 1500 grade is the same as about 500 grit so you are sanding to 1000 grit and then going all the way back down to 500 and starting again. Somewhere here in the archives I posted the comparable grits/grades a long while back.
 

Neil

Fellow
Joined
May 21, 2013
Posts
3,137
Location
Hitchin, Hertfordshire
First Name
Neil
 

Phil Dart

Moderator
Executive Member
Joined
Nov 28, 2014
Posts
5,512
Location
Colebrooke, Devon
First Name
Phil
For wood it's my melamine method all the way in most cases for me, but that won't come as any surprise to most people.

For acrylics, to 1200 grit, them Liberon 0000 wire wool with the lathe stopped, then Chestnut burnishing cream with the lathe running.

@Hallelujahal , Alex, you need to omit the friction polish at your step 2. Friction polish is shellac based but it has a wax content, and wax is a very poor substrate for anything else at all on top of it, apart from more wax. By applying friction polish before you apply your step 3, you are seriously decreasing the ability of the CA or the melamine to bond to what it's supposed to be bonding to, which is the sanding sealer. You won't be building a better shine by applying it at step 2, you'll just be shortening the life of the finish on top of it because it will have a hugely reduced resilience.
 
Last edited:

Hallelujahal

Graduate Member
Joined
Jan 5, 2023
Posts
728
Location
Lincolnshire
First Name
Alex
For wood it's my melamine method all the way in most cases for me, but that won't come as any surprise to most people.

For acrylics, to 1200 grit, them Liberon 0000 wire wool with the lathe stopped, then Chestnut burnishing cream with the lathe running.

@Hallelujahal , Alex, you need to omit the friction polish at your step 2. Friction polish is shellac based but it has a wax content, and wax is a very poor substrate for anything else at all on top of it, apart from more wax. By applying friction polish before you apply your step 3, you are seriously decreasing the ability of the CA or the melamine to bond to what it's supposed to be bonding to, which is the sanding sealer. You won't be building a better shine by applying it at step 2, you'll just be shortening the life of the finish on top of it because it will have a hugely reduced resilience.
Aha.. thanks for that 👍
 
Last edited by a moderator:

Garetine

Full Member
Joined
Jul 14, 2020
Posts
79
Location
Northern Ireland
First Name
Peter
Peter, the micromesh grades are not measured on the same scale as “normal” sandpaper. The 1500 grade is the same as about 500 grit so you are sanding to 1000 grit and then going all the way back down to 500 and starting again. Somewhere here in the archives I posted the comparable grits/grades a long while back.
Hi Neil,
You learn something every day.. After reading your reply I’ve stopped using Micro Mesh and just sand to 3000. I see any difference in the finish and it’s l much quicker. Many thank.
 

silver

General dogsbody
Executive Member
Joined
Jun 29, 2013
Posts
6,304
Location
Somewhere in Staffordshire,
First Name
Eamonn.
Just catching up with a few posts, this one particular is always a favorite of mine.

One thing I have learned over the years is, If you asked every pen turner in the world you would have a different finishing method from every one of them.

As @flexi said, like above with a a few quirks! Even the slightest change is done because he has had success with it.

What I would say is "if it aint broke don't fix it"

I agree with Phil, general rule is never use a wax before painting anything, lets face it that's what a lacquer is. The surface needs to be prepared to make sure you get the right finish.

I used to use the MM to finish I now use Yorkshire Grit, until my supply has run out then I will look at using another equally capable likewise product. (YG now been Americanized and mega expensive in the UK)
Finishing wood, some use CA (yes it’s a glue but who said it wasn’t a finish disguised as a glue) :funny: there is also car lacquer, melamine lacquer, friction polish and any amount of bespoke personal mixes that pen turners can conjure up. There is as many ways to finish a pen as there are turners.

My options (it’s only the way I finish my pens)

1. Acrylics are sand up to 1200 with the lathe running and horizontally with the lathe stopped on every grade. Final grade is horizontally only.

Then use Yorkshire grit, microfine and then a final polish with any car polish you fancy.

2. Woods and other organics.
Turn with a skew so don't have many issues with getting a nice finish.
Finish to 600, wipe down with Acetone then I melamine lacquer using a slightly adapted Phil Dart method. )For a high gloss leave overnight or 24hours to allow the lacquer to harden.) Then Yorkshire grit microfine to bring the finish to a high gloss. (Depending on the medium I generally don't start on anything less than 340.)

3. Wood/acrylic mix (so Called Hybrid blanks)
Turn with a skew so don't have many issues with getting a nice finish
Sand to 600, lathe stopped and horizontally on all grades. Then use melamine lacquer using the slightly adapted Phil Dart method. Tend not to use Yorkshire grit on these as I have found that occasionally I have had residue get between where the wood meets acrylic and leave a fine white line. Which is a bugger to remedy. (Depending on the medium I generally don't start on anything less than 340.)

The reason I don't go above 600 is that the Lacquer needs something to key too,

Remember to do it your way, if it doesn't work try another way. Once you find your MOJO and great finish then stick to it. Don’t be swayed by the many that say “use this”. It’s your choice.

Remember, we are all learning from each other but it doesn’t mean we are all right just because it works for them.
 

cookie21

Full Member
Joined
May 1, 2013
Posts
282
Location
essex/ suffolk border
First Name
Barry
Just catching up with a few posts, this one particular is always a favorite of mine.

One thing I have learned over the years is, If you asked every pen turner in the world you would have a different finishing method from every one of them.

As @flexi said, like above with a a few quirks! Even the slightest change is done because he has had success with it.

What I would say is "if it aint broke don't fix it"

I agree with Phil, general rule is never use a wax before painting anything, lets face it that's what a lacquer is. The surface needs to be prepared to make sure you get the right finish.

I used to use the MM to finish I now use Yorkshire Grit, until my supply has run out then I will look at using another equally capable likewise product. (YG now been Americanized and mega expensive in the UK)
Finishing wood, some use CA (yes it’s a glue but who said it wasn’t a finish disguised as a glue) :funny: there is also car lacquer, melamine lacquer, friction polish and any amount of bespoke personal mixes that pen turners can conjure up. There is as many ways to finish a pen as there are turners.

My options (it’s only the way I finish my pens)

1. Acrylics are sand up to 1200 with the lathe running and horizontally with the lathe stopped on every grade. Final grade is horizontally only.

Then use Yorkshire grit, microfine and then a final polish with any car polish you fancy.

2. Woods and other organics.
Turn with a skew so don't have many issues with getting a nice finish.
Finish to 600, wipe down with Acetone then I melamine lacquer using a slightly adapted Phil Dart method. )For a high gloss leave overnight or 24hours to allow the lacquer to harden.) Then Yorkshire grit microfine to bring the finish to a high gloss. (Depending on the medium I generally don't start on anything less than 340.)

3. Wood/acrylic mix (so Called Hybrid blanks)
Turn with a skew so don't have many issues with getting a nice finish
Sand to 600, lathe stopped and horizontally on all grades. Then use melamine lacquer using the slightly adapted Phil Dart method. Tend not to use Yorkshire grit on these as I have found that occasionally I have had residue get between where the wood meets acrylic and leave a fine white line. Which is a bugger to remedy. (Depending on the medium I generally don't start on anything less than 340.)

The reason I don't go above 600 is that the Lacquer needs something to key too,

Remember to do it your way, if it doesn't work try another way. Once you find your MOJO and great finish then stick to it. Don’t be swayed by the many that say “use this”. It’s your choice.

Remember, we are all learning from each other but it doesn’t mean we are all right just because it works for them.
Hi Silver, Is sanding to 1200 grit then using Yorkshire grit going backwards until the grit has broken down to a finer grit ,not sure
 
Warning! This thread has not had any replies for over a year. You are welcome to post a reply here, but it might be better to start a new thread (and maybe include a link to this one if you need to).
Top