-
Thanks for visiting The Penturners Forum today.
There are many features and resources that currently you are unable to see or access, either because you're not yet registered, or if you're already registered, because you're not logged in.
To gain full access to the forum, please log in or register now. Registration is completely free, it only takes a few seconds, and you can join our well established community of like-minded pen makers.
You are using an out of date browser. It may not display this or other websites correctly.
You should upgrade or use an alternative browser.
You should upgrade or use an alternative browser.
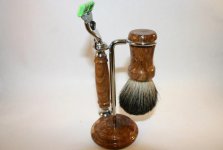
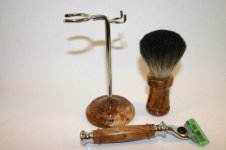
Next lady for a shave?
- Thread starter Jimjam66
- Start date
I saw them and thought they looked tacky.
Don't look so tacky now do it?
Nice job young David.
I have seen many of them before but always with plastic and thought best keep my comments to myself.
Would be interested to see how the wood holds out with water contact after a few years of use, Might not still be here in a few years to worry about it init?
Very nice David, I'm a bit like Brian, seen a lot of these but with plasticky bits instead of wood.
They look the bess knees wi wood on em. Just hope you've waterproofed em :wink::wink:
They look the bess knees wi wood on em. Just hope you've waterproofed em :wink::wink:
what finish did you put on them and did you seal the end grain's to stop the water penetrating into the wood and blowing your finish of
Just hope you've waterproofed em :wink::wink:
I used CA and worked very hard to seal the wood against water ingress. After squaring the blank I flooded the end grain with thin CA then squared off again. The recess in the brush handle got a coat of CA too, so fingers crossed we are good to go!
MikeD
Registered
That really is very nice. let us know how the waterproofing gets on.
BTW does your wife know you've started a new line of business shaving ladies
BTW does your wife know you've started a new line of business shaving ladies

retreatjohn
Full Member
Nice to see in wood, not plastic!!!
- Joined
- Jan 31, 2013
- Posts
- 9,505
- First Name
- Terry
Very nice David. They look the bees knees. Is that the mach 3 razor by the way.??
My first impressions were that you needed a new razor to keep your skinhead look!!!!!!!! LOL


My first impressions were that you needed a new razor to keep your skinhead look!!!!!!!! LOL


Yep, that's a Mach 3 fitting, looks like I may do one for me as well as my Dad.
Now I know what they come out like.
Very nicely done that, like the shaping on the razor handle.
Now I know what they come out like.
Very nicely done that, like the shaping on the razor handle.
bluntchisel
Registered
I like 'em, too, David. Next time, however, as some of the guys have already intimated, try a nice acrylic blank. No problems about a set made of this ever suffering from damp!
Regards,
Bob.
Regards,
Bob.
Love it Dave - Less painful than a Brazillian ....
Need to try this kit , no-no not the Brazillian...
Need to try this kit , no-no not the Brazillian...
bluntchisel
Registered
Hi Woody,
Yes, thanks, I did get the blanks. However, when I checked the costs of the various components to make shaving kits I found them to be quite expensive. Wasn't sure if I'd get my outlay back(?)
Regards,
Bob.
Yes, thanks, I did get the blanks. However, when I checked the costs of the various components to make shaving kits I found them to be quite expensive. Wasn't sure if I'd get my outlay back(?)
Regards,
Bob.
That looks smashing David, a really cracking piece of work :up:
That the voice of experience Rowdy ?????


Less painful than a Brazillian ....
That the voice of experience Rowdy ?????


That the voice of experience Rowdy ?????
You never know what them boys get up to when their underwater in a tin can.
It's wise not to ask says the voice of experience.
I used to be a lifeguard, but some blue kid got me fired.
I like 'em, too, David. Next time, however, as some of the guys have already intimated, try a nice acrylic blank. No problems about a set made of this ever suffering from damp!
Regards,
Bob.
Don't call me, I'll call you! Promise I will ...


Penpal
Grand Master
David, must confess to uncertainty with that headline half expect the next one to be first lady forward etc, I do think your CA sealing a great move also to stress on careful drying after use. I have used a pigs bristle wood brush for over thirty years now looking a bit worse for wear but losing bristles first. WEll made looks great mate.
Kind regards Peter.
Kind regards Peter.

For those of you considering making a razor in wood (Bob, you can go back to what you were doing  ) this is how you seal the end grain: after squaring off the blank to the tube, stand it upright and flood the flattened area with thin CA.

Leave for a minute or two, hit with activator and square off again, being careful to leave a thin milky 'skin' of CA.

And off you go ...
 ) this is how you seal the end grain: after squaring off the blank to the tube, stand it upright and flood the flattened area with thin CA.
Leave for a minute or two, hit with activator and square off again, being careful to leave a thin milky 'skin' of CA.

And off you go ...


