• Thanks for visiting The Penturners Forum today.

    There are many features and resources that currently you are unable to see or access, either because you're not yet registered, or if you're already registered, because you're not logged in.

    To gain full access to the forum, please log in or register now. Registration is completely free, it only takes a few seconds, and you can join our well established community of like-minded pen makers.

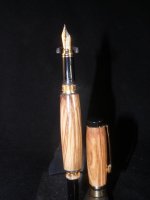
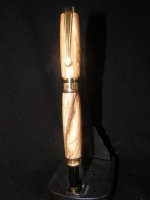
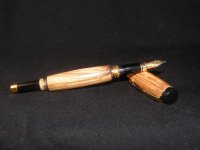
Tarditional fountain pen in Olive wood

Sgreen

Registered
Joined
Mar 12, 2015
Posts
215
Location
Sheffield
First Name
Simon
My very first fountain pen also the first pen that wasn't 7mm. The light box and phytography still needs work, the pictures don't do the pens justice. On the turning front: I have come a long way in a short time now I need experience and more patience.

Any comments are welcome the more constructive the better.
Simon

PS. Soon be ready for competitions...
P8280007.jpg

P8280009.jpg P8280006.jpg
 

Buckeye

ペンメーカー
Executive Member
Joined
Oct 15, 2013
Posts
9,697
Location
UK
First Name
Peter
The front section has got some gunk or something on it, it doesn't look very good where it meets the thread. In the second photo you can see what looks like sanding marks on the lower barrel are you using micro mesh?

You would be better to stick to a white background until you have mastered it, before using a black one, in the last photo the top barrel look grossly overturned, but I can see that it is the black background that makes it look that way.

Peter
 

Sgreen

Registered
Joined
Mar 12, 2015
Posts
215
Location
Sheffield
First Name
Simon
Buckeye: Thanks for the great feedback. All feedback is good feedback in my view and limited experience in turning.

I have already sourced some white cloth to try in the light box. I also think I need more light but will experiment.
I use wet and dry up to 2000 grit and then spray-on lacquer. I didn't notice those scratches until you mentioned them. Some thing for me to work on is quality inspection.
The gunk is cream. The inside threaded band came out of the cap so I covered the thread in cream so I wouldn't bung up the thread with glue. It seemed a good idea at the time. It actually looked clean but I guess that's what HD photography does.
 

Buckeye

ペンメーカー
Executive Member
Joined
Oct 15, 2013
Posts
9,697
Location
UK
First Name
Peter
Buckeye: Thanks for the great feedback. All feedback is good feedback in my view and limited experience in turning.

I have already sourced some white cloth to try in the light box. I also think I need more light but will experiment.
I use wet and dry up to 2000 grit and then spray-on lacquer. I didn't notice those scratches until you mentioned them. Some thing for me to work on is quality inspection.
The gunk is cream. The inside threaded band came out of the cap so I covered the thread in cream so I wouldn't bung up the thread with glue. It seemed a good idea at the time. It actually looked clean but I guess that's what HD photography does.

Just use a piece of white photocopy paper, no texture. I always use a pair of white cotton gloves when I arrange the pens for photography and can wipe all surfaces of the pen, especially the metal parts. Nothing looks as bad as fingerprints, grease, smudges etc.

Peter
 

flexi

Executive Member
Joined
Sep 12, 2014
Posts
6,457
Location
Maidstone
First Name
mark
If i want to get critical with my pens....take a snap with a mobile....that will show your flaws very quickly in the workshop:thumbs:
As for your pen....not bad for your 1st fountain pen...
 

Penpal

Grand Master
Joined
May 26, 2013
Posts
25,342
Location
Canberra AUSTRALIA
First Name
Peter
The problem of using a material background is it needs to be ironed continually. I use 11 by 14 copy paper one ream has lasted twenty plus years, this size allows for an endless or seamless background.

Having said that many people use tone black and colour as well as very tricky lighting.

The problems you had making this your first fountain pen you know now but looking from over here its a credible start mate.

Peter.
 

Sgreen

Registered
Joined
Mar 12, 2015
Posts
215
Location
Sheffield
First Name
Simon
Thanks for the comments. I know I have lots to work on which is why I posted the pictures on here. I always want to be better so yes please, keep the comments coming. Although my chances are limited I am still on target to enter the next competition and hopefully beat out Australian friends. One day I will win and that will show me how far I have come. If your wondering if you should enter competitions on here my answer would be do it, nothing to lose and bragging rights to gain.

PenPal; I can't remember the last time I ironed. I think it was some edging on a worktop.
 

Penpal

Grand Master
Joined
May 26, 2013
Posts
25,342
Location
Canberra AUSTRALIA
First Name
Peter
Thanks for the comments. I know I have lots to work on which is why I posted the pictures on here. I always want to be better so yes please, keep the comments coming. Although my chances are limited I am still on target to enter the next competition and hopefully beat out Australian friends. One day I will win and that will show me how far I have come. If your wondering if you should enter competitions on here my answer would be do it, nothing to lose and bragging rights to gain.

PenPal; I can't remember the last time I ironed. I think it was some edging on a worktop.

People get ironed out every day mate. I must confess it was in the 50,s w=in National Service when I last ironed out.

See you in the next Competition mate.

Peter.
 

Bill Mooney

Blind old git
Grand Master
Joined
Aug 16, 2014
Posts
11,096
Location
County Durham
First Name
Bill
That's a good pen for a first FP. Sound advice from Peter. I don't forget that I've been where you are in your learning curve & you are doing ok. Each time you turn something you will gain something.:thumbs:
 

Les ELm

Executive Member
Joined
Oct 19, 2014
Posts
5,493
Location
Red Deer, Alberta, Canada
First Name
Les
Form, Fit and Finish look well :thumbs: done.
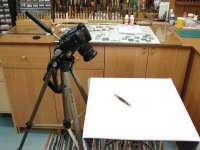
I use a white sheet, florescent overhead shop lighting and d tripod for my photo set up.

Les
 

Attachments

  • DSC09545.jpg
    DSC09545.jpg
    69.6 KB · Views: 12
Warning! This thread has not had any replies for over a year. You are welcome to post a reply here, but it might be better to start a new thread (and maybe include a link to this one if you need to).
Top