Neil
Fellow
This Pencil kit has several names, as above. Its one of the two that I sell, the other being the vertex. The other pencil that PSI make that carries the same mechanism as the vertex (so I am told - never made it) , the Stratus is apparently as good as the vertex but this is the sum total of the pencils that I trust from the industry.
However the Workshop pencil has some shortcomings if you hav'nt made any, mainly in the assembly.
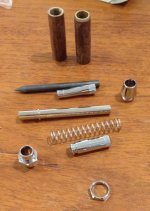
Here's a picture of the bits:

The two turned blanks at the top, the lead, 5.6mm and it is supplied with a 4B (available leads are HB, 2B, 4B and 5B and also coloured leads for the artists.), the collet and the screw in nib section to the right. Below that the rather flimsy tube and the spring that makes it all work, the centre band to the lower left, the top and sharpener and at the bottom the ring that fits on the rebate to finish it off at the top.
The one problem with this pencil is that you have to put the spring on the tube to the left of the ring on the tube, compress the spring and then put the screw in nib section on the assembly and then put the collett on and squeeze it all in place. The tube is a thin guage piece of material and on more than one occasion the entire assembly has sprung forth from the assembly press flinging the components to all four corners of the office (which finding things in is nigh on impossible at the neatest of times!) and when you do find the bits you realise that the flimsy tube now has a tear in it and wont compress on to the collett section rendering the entire thing useless.
Had a quick thought and having opened many packets in Wickes found that the 6mm mail (supplied only in 150mm lengths!) was just the right size. So cut and finished the end of the nail to size and the way that I now assemble the pencil is to first thread the collett section onto the nail, then the nib section, then the spring and then the flimsy tube. You can now compress the spring and locate the first millimetre of the flimsy tube over the collett section and place the assembly into the pen press without it trying to do an impression of a blue peter rocket.
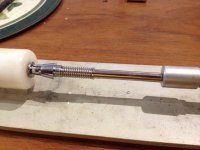
This is how it should look if youve understood my witterings.

You can now compress the entire assembly with much more confidence. The nail head can be seen next to the polypropolene section on the pen press, the remainder of the nail has been cut short to finish at the other end to stop over compression of the assembly. Care is still needed as the parts that need to be compressed together are not very well engineered for such a task. I finished off 35 without buggering another one up so I was pleased with that.
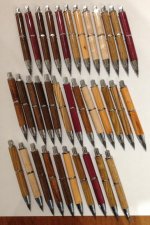
Here's the result.

However the Workshop pencil has some shortcomings if you hav'nt made any, mainly in the assembly.
Here's a picture of the bits:

The two turned blanks at the top, the lead, 5.6mm and it is supplied with a 4B (available leads are HB, 2B, 4B and 5B and also coloured leads for the artists.), the collet and the screw in nib section to the right. Below that the rather flimsy tube and the spring that makes it all work, the centre band to the lower left, the top and sharpener and at the bottom the ring that fits on the rebate to finish it off at the top.
The one problem with this pencil is that you have to put the spring on the tube to the left of the ring on the tube, compress the spring and then put the screw in nib section on the assembly and then put the collett on and squeeze it all in place. The tube is a thin guage piece of material and on more than one occasion the entire assembly has sprung forth from the assembly press flinging the components to all four corners of the office (which finding things in is nigh on impossible at the neatest of times!) and when you do find the bits you realise that the flimsy tube now has a tear in it and wont compress on to the collett section rendering the entire thing useless.
Had a quick thought and having opened many packets in Wickes found that the 6mm mail (supplied only in 150mm lengths!) was just the right size. So cut and finished the end of the nail to size and the way that I now assemble the pencil is to first thread the collett section onto the nail, then the nib section, then the spring and then the flimsy tube. You can now compress the spring and locate the first millimetre of the flimsy tube over the collett section and place the assembly into the pen press without it trying to do an impression of a blue peter rocket.
This is how it should look if youve understood my witterings.

You can now compress the entire assembly with much more confidence. The nail head can be seen next to the polypropolene section on the pen press, the remainder of the nail has been cut short to finish at the other end to stop over compression of the assembly. Care is still needed as the parts that need to be compressed together are not very well engineered for such a task. I finished off 35 without buggering another one up so I was pleased with that.
Here's the result.


