• Thanks for visiting The Penturners Forum today.

    There are many features and resources that currently you are unable to see or access, either because you're not yet registered, or if you're already registered, because you're not logged in.

    To gain full access to the forum, please log in or register now. Registration is completely free, it only takes a few seconds, and you can join our well established community of like-minded pen makers.

Getting back in the pen saddle...

sfurini

Graduate Member
Joined
Sep 1, 2015
Posts
478
Location
United Kingdom
First Name
Stewart
What holds the pen body on the mandrel?
Seen all kinds of mandrels for kitless pens but can't work this one out. :thinks:
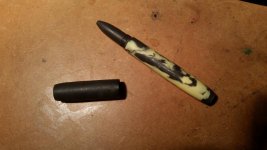
It's a very crude pin mandrel that needs a little more work. It's git a very rough flat filed onto it and a shortened nail acts as the pin.

Sent from my SM-G900F using Tapatalk
 

Macaronytony

Graduate Member
Joined
Mar 21, 2015
Posts
701
Location
United Kingdom
First Name
Tony
Thanks for the explanation, if I had seen a flat area I would have guessed that.
Just thought you had come up with some super easy way.
 

sfurini

Graduate Member
Joined
Sep 1, 2015
Posts
478
Location
United Kingdom
First Name
Stewart
Well I got home from work much earlier than expected today so got out to the workshop. In terns of work flow I'm pretty much showing my method step by step...not because I think it's the best way to do it but just because this is how I do it. This is only my 6th kitless pen.

First step with the nib is a piece of blank about 5mm long on which a tenon is turned for the M9 x 0.75 thread.

1540efac5a35eeed972d2730d7a0c965.jpg


f93e98d079162cef950dafe2a119be51.jpg


Next a thin parting tool is used to clear up the back of the threads so that the nib section will screw fully into the barrel.

e4f4898424b431db105a07d1c88f6bd5.jpg


Then comes the drilling for the refill. Centre drilled first and then drilled 33mm deep with a 1/4 inch drill bit.

d82bad49538c97f0dddc3cc1e4743d4d.jpg


Then a 3/16 bit for another 3mm (love using imperial and metric at the same time...)

6547a1be9beca5378913b3ad6ab251b9.jpg


I then reverse the nib section in the collet and drill through with a 7/64 bit.

890eea2b410c57e58273ad1117beb9f3.jpg


Finally for this post a test fit of the nib in the barrel with a refill in...perhaps the nib section is a tiny bit short. I'd have preferred less nib sticking out...

6ac87dabe744346ec8020cfd2c8a0a16.jpg


Sent from my SM-G900F using Tapatalk
 

sfurini

Graduate Member
Joined
Sep 1, 2015
Posts
478
Location
United Kingdom
First Name
Stewart
Thanks for the explanation, if I had seen a flat area I would have guessed that.
Just thought you had come up with some super easy way.
Nope. But my first one was turned too small so I didn't bother with a flat. Just wrapped masking tape round it and jammed the barrel on!

Your pen ideas look great in the sketches!

Sent from my SM-G900F using Tapatalk
 

sfurini

Graduate Member
Joined
Sep 1, 2015
Posts
478
Location
United Kingdom
First Name
Stewart
The nib continued...

Back in the collet and turned down to just shy of the barrel threads...about 11.6 mm.

4ea4d60635ea0f17f30d660e8ff65fe3.jpg


Then reversed again and the front of the nib roughly shaped.

0eb16f872105e4899ef23d05d66991cb.jpg


91fa4899853d0ef96b8709870f6a2e03.jpg


Here's the test fit photo that should have been at the end of my last post...

3863934abffbdd32a3940c80e7beba62.jpg


Then final shaping on a delrin mandrel...threaded for the nib section to screw onto. Cuts have to be very gentle...

e9f2faf118df2351204f9b110242f9a6.jpg


934a1290289b06e79d9d96d8ab812e59.jpg


Sanded and micromeshed and fitted to barrel...

6d8a8bb79a62cf8ecd5598a4cc8d013b.jpg


Just the lid and final buffing to go!

Sent from my SM-G900F using Tapatalk
 

sfurini

Graduate Member
Joined
Sep 1, 2015
Posts
478
Location
United Kingdom
First Name
Stewart
And finally onto the cap...no clip on this...

Face off and centre drill. Then drill for cap threads and to full depth of cap. I think it's an 11.4mm drill bit but I can't make out the size anymore! Then a very shallow drilling with 31/64 bit so that the cap will thread up snugly to the body...

f022b494db2847365e711ca5bc476ca6.jpg
bd0ce6b62f20bc6b74fb0ec32a6e3dee.jpg
8ab602bf70afca91440b062a7178937e.jpg
d9e04363edf564355e55debefc9d632c.jpg
8255f3cf1a11e61eef2beb68b65e6814.jpg
794d2815fc0a7071a929bc74ccfa4c20.jpg


Next turn down the barrel to final width and then reverse in a smaller collet and do top end of barrel...

022aa462358e2c84e9ba60d17b93d1ab.jpg
ff6c745d08f51124de8691aa35444804.jpg


Then using a jam chuck mandrel final shaping and sanding...

e92e43290d5324f77756080355a909fe.jpg
44a8d55bf6839bccf7a7ac526ce03f83.jpg


Sent from my SM-G900F using Tapatalk
 

sfurini

Graduate Member
Joined
Sep 1, 2015
Posts
478
Location
United Kingdom
First Name
Stewart
Then buffing. ..

95d917c5514a700faf7cc7698be2f01a.jpg


I use supplies from the polishingshop. Pictures after each compound in order...

1836f04050db671c3f7c2596b7785b98.jpg
9787a0a3e685b12dbac4516617a5cdd1.jpg
e176b571ad34fd0f066150b9e0712adb.jpg


Lastly some ren wax which is then buffed off with a soft cloth...

386995a9e438baf3955cb90532a861ea.jpg


...and left it too late to photograph the completed pen...need better light so that will have to wait until tomorrow!


Sent from my SM-G900F using Tapatalk
 

sfurini

Graduate Member
Joined
Sep 1, 2015
Posts
478
Location
United Kingdom
First Name
Stewart
Thanks for sticking with it through the whole thread, Tony. I made another pen today - only took about 40 minutes, mainly because I had gone through making this one so painstakingly. Made a shorter nib section on this one as the cap on the purple pen does look a bit long. Oddly, the new pen today came out shorter when I was intending to make the body longer! It needs final sanding and buffing...

2016-04-16 22.31.32.jpg
 

sfurini

Graduate Member
Joined
Sep 1, 2015
Posts
478
Location
United Kingdom
First Name
Stewart
Just wondering why you used a 9 X 0.75 thread?

Sent from my D6683 using Tapatalk

Hi
Probably because I read about someone using it! The margins between all the threads are quite fine. The cap thread reduces the diameter of the barrel tenon to 11.2mm. The nib thread in the barrel gives an inner diameter at the maximum thread depth of 9.75mm. This leaves a wall thickness between the threads of 1.45mm divided by 2 if I've understood taps and dies correctly. I realise that sounds thin but in practice it hasn't caused any issues.

With the nib section itself the wall is even thinner. The tenon is turned to about 8.8mm and the 9 X .75 die is used on it. This gives a diameter of 8.25mm. The hole for the refill is 6.4mm. This gives a maximum wall thickness between the inner wall and the bottom of the thread of 1.75mm divided by 2.

Overall the threads part of the barrel has a thickness of about 1.8mm and the nib section one of 1.3mm. My thinking is that it's better to have he thicker tenon on the barrel as this gets more use than the nib section thread.

Here's a shot of the two tenons....

124b8d92c93e465a28ea6497e0b6c13d.jpg
 

Macaronytony

Graduate Member
Joined
Mar 21, 2015
Posts
701
Location
United Kingdom
First Name
Tony
Be a while before i'm knocking them out in 40 minutes Stewart.
I purchased 9,10,11,12 x 0.75 taps and dies after reading something somewhere, just never had the bottle to try them till I followed your post.
Thanks again for all the great info and pictures... :thumbs:
 

sfurini

Graduate Member
Joined
Sep 1, 2015
Posts
478
Location
United Kingdom
First Name
Stewart
I'm glad it's been a useful thread, Tony.

I would say, that I've not had much success with threading polyester resin that I've cast at home but homecast polyurethane resin which I used on this pen is lovely to thread!
 

Macaronytony

Graduate Member
Joined
Mar 21, 2015
Posts
701
Location
United Kingdom
First Name
Tony
Where do you get the Alumilite blanks from, Stewart?

Managed to turn and thread some clear Acrylic, that went ok. Just got some ebonite blanks off Phil at Beaufort Ink so playing with that next.
 

sfurini

Graduate Member
Joined
Sep 1, 2015
Posts
478
Location
United Kingdom
First Name
Stewart
Where do you get the Alumilite blanks from, Stewart?

Managed to turn and thread some clear Acrylic, that went ok. Just got some ebonite blanks off Phil at Beaufort Ink so playing with that next.

The alumlite is from www.metalclay.co.uk but I've also used polyurethane resin from mb fibreglass. Will see if I can find a link.

This is my casting mould...

91303898dd575ff3b106987fb7456e28.jpg
 

Phil Dart

Moderator
Executive Member
Joined
Nov 28, 2014
Posts
5,514
Location
Colebrooke, Devon
First Name
Phil
What a great how to Stewart.

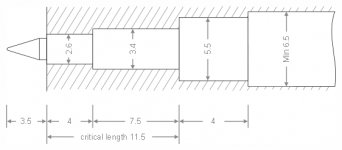
Yourself and others may or may not find this drawing of use for future rollerballs, for the internal geometry of the section. It will allow the refill to protude by 3.5mm. The element that is 3.4 i/d is not a critical diameter - you could just as easily make that whole 11.5mm the same diameter at 2.6, but its presence makes it easier to insert the refill.

custom RB section internal geometry.jpg
 
Warning! This thread has not had any replies for over a year. You are welcome to post a reply here, but it might be better to start a new thread (and maybe include a link to this one if you need to).
Top