• Thanks for visiting The Penturners Forum today.

    There are many features and resources that currently you are unable to see or access, either because you're not yet registered, or if you're already registered, because you're not logged in.

    To gain full access to the forum, please log in or register now. Registration is completely free, it only takes a few seconds, and you can join our well established community of like-minded pen makers.

Achieving success with melamine as a finish

Penpal

Grand Master
Joined
May 26, 2013
Posts
25,342
Location
Canberra AUSTRALIA
First Name
Peter
My son in law and his father were using it forever ago it seems resorted to making their own version because of the price. Neat to know Phil these days with his explanations re the use of. How are you travelling right now Neil.

Peter.
 

GSteer

Registered
Joined
Apr 9, 2015
Posts
362
Location
Soaked Cumbria, UK
First Name
Greg
Quick question regarding temperature. There's a note on the Chestnut Acrylic bottles not to use below 15deg ambient but nothing on the Melamine. I'm presuming this is the difference between water/solvent based for drying times.

But what temperature is everyone's workshops where you're applying melamine? I'm think I might be trying to apply whilst a little cold (14 deg yesterday) which is adding to my catching. along with too much lacquer and a currently inexperienced technique.
 

yorkshireman

Wood Rat
Executive Member
Joined
Jan 5, 2013
Posts
5,206
Location
wrexham
First Name
Keith
I've been using the melamine for the past couple of months Greg and never gave temperature a thought. It's worked every time for me at cool temperatures. Try putting it on with the lathe switched off, turning the blank by hand as you apply it. When the melamine starts to 'grab' then burnish it. Hope that makes sense. It's a pity you weren't nearer north wales or I'd nip round and show you.
 

donwatson

Fellow
Joined
May 27, 2014
Posts
2,714
Location
Glenrothes, Fife
First Name
Donald
Thanks for this Phil. I have downloaded the file and printed it for use in the shed.
I have some pens to make from the clients supplied wood, whisky barrel staves.
I have made an Axminster Gold Stylus Pen and I can't in all truth sell it due to its inferior finish.
I will try your method and let you know how I get on.
take care
Don W
PS I couldn't get a smooth finish. I used a skew to size then J-Cloth down to 400 grit. I used the method you described but still have grooves/splits in the wood. I will check out your method and let you know.
 

rayberry

Apprentice Member
Joined
Sep 3, 2017
Posts
6
Location
Kings Lynn
First Name
Raymond
Thank you for doing this Phil. It was well worth it for me. You can't beat a tried and tested yet fairly quick and simple method.

Take care

Ray
 

21William

Fellow
Joined
Jan 21, 2016
Posts
1,629
Location
Dorset
First Name
William
I’m sure I read somewhere else that another wood turner gets a gloss finish with Melamine by letting it dry for a few days and then buffing it to a gloss with mops and compounds. Final finish was I believe microcrystalline wax. Obviously no one on here has tried this yet. Maybe pens could also be dipped in Melamine rather than wiping it on?
 

Seb

Apprentice Member
Joined
Mar 20, 2020
Posts
19
Location
West Yorkshire
First Name
Seb
Thank you for this Phil. I've picked up some Melamine Lacquer, so will be testing this out shortly. I use a mandrel for my slimline kits, and generally do a non-CA finish. Would you suggest using HDPE bushings with Melamine or does it not quite cause the problems that CA does with regular bushings?

p.s I'm just on your site now, so will be looking to order some new kits shortly. Cheers.
 

Phil Dart

Moderator
Executive Member
Joined
Nov 28, 2014
Posts
5,512
Location
Colebrooke, Devon
First Name
Phil
I've never used anything but the kit bushes Seb. It doesn't stick or have the same viscosity as CA, so I've never experienced a problem using the normal bushes. A quick tidy up of the ends of the barrels would do no harm if the melamine has dribbled a bit between the work piece and the bushes. Just hold it perpendicular to a piece of 400 grit and give it a couple of passes. Usually though, the melamine soaks in to the end grain, and there is no need.
.
 

Seb

Apprentice Member
Joined
Mar 20, 2020
Posts
19
Location
West Yorkshire
First Name
Seb
I've never used anything but the kit bushes Seb. It doesn't stick or have the same viscosity as CA, so I've never experienced a problem using the normal bushes. A quick tidy up of the ends of the barrels would do no harm if the melamine has dribbled a bit between the work piece and the bushes. Just hold it perpendicular to a piece of 400 grit and give it a couple of passes. Usually though, the melamine soaks in to the end grain, and there is no need.
.

Cheers Phil, I appreciate this.
 

Skil Phil

Full Member
Joined
Sep 1, 2013
Posts
226
Location
South Africa
Thanks Phil,
Easy to follow.
I found a supplier is South Africa for Chesnut products.
The price equates to 20 Pounds where Axminster's price is 9 Pounds for a 500ml tin.
The sanding sealer price is totally ridiculous.
With the exchange rate rocketing it will be a terrible price for the next shipment.
Better get some when the lock down is over while there is still stock.
What is the shelf life? Maybe I should get 2 tins.

Phil
 

Penpal

Grand Master
Joined
May 26, 2013
Posts
25,342
Location
Canberra AUSTRALIA
First Name
Peter
Twenty years ago in the UK my son in law with his Father made their own Melamine,when he migrated he had been turning for some years, he found various cuts of the Melamine formula enabled various finishes,his advice to me was beware of the fumes.

Peter.
 

golum

Apprentice Member
Joined
May 7, 2020
Posts
36
Location
Cheshire
First Name
Andrew
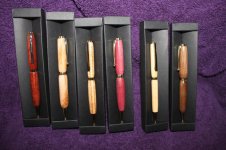
Having tried various ways to apply melamine lacquer, I have finally discovered what works best form me...

I got a modelers airbrush, and apply 5 = 6 thin spray coats leaving about 1 min between each coat....
to spray the lacquer (I use chestnut ) dilute it with about 10-20% acetone (and use a good grade 99% at least, or your finish will be cloudy) you only need about 2 ml of the diluted lacquer to give you the 6 coats...then fill the cup with acetone and spray outside till empty to clean the brush or you will irredeemably clog it. :nonono:
leave for 5 mins and the finish is hard enough to handle.

Dont over spray/over coat.
keep the work spinning
DO wait between coats
and a coat of sanding sealer underneath helps.

of course your mileage may vary, but it works well for me

IMG_0691.jpg
 
Warning! This thread has not had any replies for over a year. You are welcome to post a reply here, but it might be better to start a new thread (and maybe include a link to this one if you need to).
Top